
Creepy Hanging Cage Halloween DIY
Spook your neighbors and trick-or-treaters with this creepy hanging cage Halloween DIY! Using only items from Dollar Tree, this “cage” is sure to add some creepiness to your outdoor Halloween decor.

I cannot believe that Halloween will be here next week! It seems like when October comes the rest of the year just flies by. I’m not ready for all of this business yet!
Today’s DIY is an easy creepy hanging cage using only items from Dollar Tree. I came across a similar DIY on Pinterest a few years ago and finally got around to making my own this year. I’m glad I did because I love the way it turned out!
Let’s get started, shall we?
See these great Halloween DIYs, too!
Spooky Crystal Ball
Haunted Mirror
Light-up Spider Web Wreath
How to make a creepy hanging cage
What you need:
*Post contains affiliate links. It’s free for you to click the links, however if you choose to make a purchase I will get compensated. To learn more click here. Thank you for supporting my blog!
- 2 laundry baskets
- 1 or 2 plastic chains
- Nylon cable ties
- Decorations, such as a skeleton, rats, plastic arms, skulls, etc.
- Black spray paint

What you do:
Step 1:
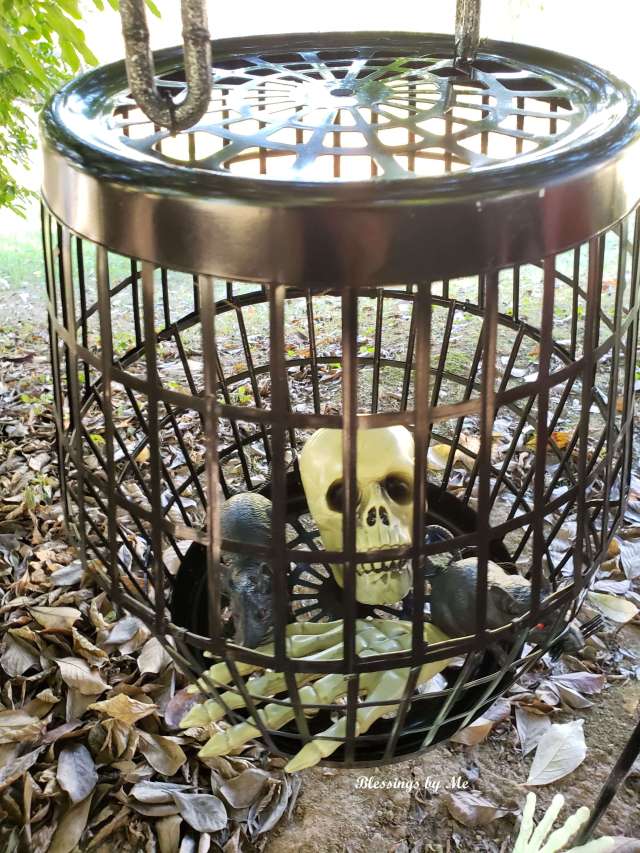
The first thing you’re going to do is cut the top part off of both baskets. I cut along that first “line” from the very top of the basket. I used wire cutters for this because scissors just weren’t cutting it. (Pun intended.)

Step 2:
After cutting the top off of both baskets, spray paint them using black spray paint. You can use any color you want here, but I loved the way the black looked. Plus it’s Halloween!

Step 3:
Start adding your decorations to the inside of your baskets. I chose to put a skeleton and 2 rats in mine. At the last minute I found a plastic skeleton hand while digging through my Halloween box. I added it to my cage and placed the rat next to it so it looks like the rat is eating the hand.
After your decorations are inside, put the baskets together one on top of the other, and use the nylon ties to hold them together. I put all the ties on first, then tightened them and cut the end parts off.

Step 4:
Add the chain to the top of your hanging cage using the nylon ties. This part was a little tricky because I had to hold the chain up with one hand and tie the tie around with the other hand.
Hopefully you can see in the picture how to tie it together. I placed one end of the chain on one side of the basket and tied it down, then placed the other end of the same chain on the opposite side and tied it down.

Step 5:
Find a spot outside and hang up your new creepy hanging cage Halloween DIY!
I was happy with the way mine turned out. It looks rather creepy hanging under the tree in my back yard.


Do you decorate with outside Halloween decor?


It’s surely spooky! Especially if the skeleton head is glowing in the dark! Awesome decor, Michelle!
Thank you so much! It does look spooky in the dark. 🙂
It’s really spooky, love this decor! 🙂
Thank you so much! 😀
I would have never guessed that you used two laundry baskets, that surprised me LOL that’s so great. It looks really great and so simple to make. Thank you.
Thank you! It was a lot of fun to make this one. I had fun trying to figure out what I wanted to put inside to make it look creepy. 🙂
Michelle this is so neat. I would of never thought to do this. How cool. Great Halloween decor to share.
Thank you so much! It was a lot of fun making this one. 😀
I love this! I may make a smaller version as part of a costume for a Halloween party. 😀
Thank you! That would be really cute. I thought about making a small one and hanging it in the corner of my living room, but of course my Dollar Tree was out of the small baskets. 😀
Wow! What a neat idea!!
Thank you so much! 😀
Nice! Great idea! ?
Thank you so much! 😀
You’re welcome! ?
Another great idea. Love the aundry basket idea. Thanks
Thank you so much! 😀
So fun! I bet you have the best decorated house in your neighborhood this time of year!
Aww thank you! There’s only 2 other people in my neighborhood that actually decorate for Halloween and one of them started on the first day of fall!
Oh my gosh, that’s a bit intense I’d say! I can’t imagine what they do for xmas then!
Oh they go all out. I swear they add more decorations every year!!
Looks very cool Michelle and so simple. Love It!
Thank you so much!! 😀
I would have never guessed laundry baskets when I first saw the picture! Very clever!
Thank you so much!! 😀
You’re welcome!
Oh my goodness… how cool is this! Great DIY!
Thank you so much! 😀
Creative as always. Well done ma’am.
Thank you so much! 😀
You are welcome ma’am. ❤
The hand looks creepiest?
I think so, too! It glows in the dark so it freaks me out when I look out the window at night because I forget it’s there! 😀
Frightening! But at least you you know that it’s a scary prop. Otherwise you could be taken by surprise into a panic ))?((!
You’re very talented and creative. Good job?????
Thank you so much!! 🙂
So cool, it does look spooky and black was the perfect color for this. Also, wanted to ask a question…not sure what is going on with my end but I have noticed I keep coming up unfollowed on your site. I keep hitting follow to correct that but it keeps popping off when I check to see what cool things you are up to. I usually visit your site when I see you have stopped by mine. I hope you don’t think I am doing that unfollowing business especially since you are one of my favorite followers that stops by my site all the time. That would be rude of me. I am terrible at technical things so who knows what that is about. Anyway, just wanted to let you know…that’s not me. I have resorted to just accepting it…weird.
Thank you so much! I completely understand. It’s happening to me, too on a lot of blogs. When I refresh the page it shows I’m following, but sometimes it won’t let me comment or like anything. I’ve noticed a lot of others having the same problem so maybe it’s a WordPress thing? I have no idea. I know it’s frustrating! I really appreciate your support and your comments. I love reading your blog posts and seeing what you’re creating and finding at thrift stores. 😀
Innovative and spooky. You have very talented. I will try this out.
Thank you so much! Have fun making your creepy cage! 😀
You are so darn creative, Michelle!! Who would have thought to create the cage from laundry baskets!! Super spooky decor for a lovely backyard!!
Thank you!! It was a lot of fun figuring out how to put this together. ?
I think I might walk on the other side of the street. Life looks a bit too spooky over there.
Well done! I am truly amazed with all of your creations.
Haha!! Thank you!! I don’t usually do so much for Halloween, but I figured I needed a few more decorations. ?
You are brilliant! 😀 This is creepy and awesome. I never in a million years would guess that this was so cheap to make. Your trick or treaters are going to LOVE your decorations! Do you get many there?
Hope all is well in your neck of the woods Michelle! ♥
Thank you!! We get a few, but usually I’m out with my daughter walking the streets begging for candy. 😀 Do you get a lot?
We are doing well, thank you! Trying to get the windows sealed and painted before all the rain comes in tonight. Always something! I hope you all are doing well! 🙂
I have commented on this post before from my cell phone but I don’t know where that comment has gone… anyway this DIY Halloween cage is awesome.. I couldn’t have believed it is that easy to make until I saw your post…you are too good at DIYs.. thanks for sharing…❤️
http://www.geniusenough.com
Thank you so much! It’s fun to add the creepy decorations inside, too. 🙂 No worries about the comment. I’ve been having trouble with disappearing comments, too lately. WP is really frustrating me some days.
Cool idea!
Thank you!!
You’re welcome ?
Yeah, that is so frustrating. I have to go back into posts to check things but I am slowly learning how everything works so I am getting better at that…hopefully. I am keeping your in-laws in my prayers too. I hope all is well with them. Have a great week.
Thank you so much for your prayers!! I hope you have a great week!
I love this idea. I’ll have to file it away for next Halloween. Thanks for sharing!
Thank you so much! It’s a lot of fun to make, too. 🙂
We will be doing this next year! Great idea!
Thank you! It’s a lot of fun to make, too! 🙂
It must look awesome at night too with the glow in the dark element!
It does! Super creepy. ?