
Spooky Crystal Ball DIY
A spooky crystal ball is perfect for your Halloween decor. Make this DIY using only items from Dollar Tree.

FYI: This post is updated from last year.
Dollar Tree is still one of my favorite stores to grab a bunch of stuff for cheap to make cute DIY’s with. However, this year I haven’t stepped foot into a Dollar Tree since March. How sad is that?
Since I haven’t really had the time to create any Halloween DIY’s right now (or the motivation), I thought I would update and share this spooky crystal ball with you again. And so all of my new followers can have see the easy tutorial as well.
By the way, if you are a new follower, welcome! I’m so glad you’re here!
Now let’s get on with how to make a spooky crystal ball for Halloween.
Looking for more Halloween inspiration?
Cobweb Wreath
Light-up Spider Web Wreath
Haunted Mirror
Creepy Hanging Cage
How to make a spooky crystal ball
What you need:
*Post contains affiliate links. It’s free for you to click the links, however, if you choose to make a purchase I will get compensated. To learn more click here. Thank you for supporting my blog!

- Glass dish
- Glass bowl
- 2 glass candle holders
- Creepy cloth
- Plastic embellishments (creepy crawlers, spiders, etc.)
- Taper candle or lighter
- Black spray paint
- E6000 Adhesive
(I purchased everything at Dollar Tree except for the paint and adhesive.)

What you do:
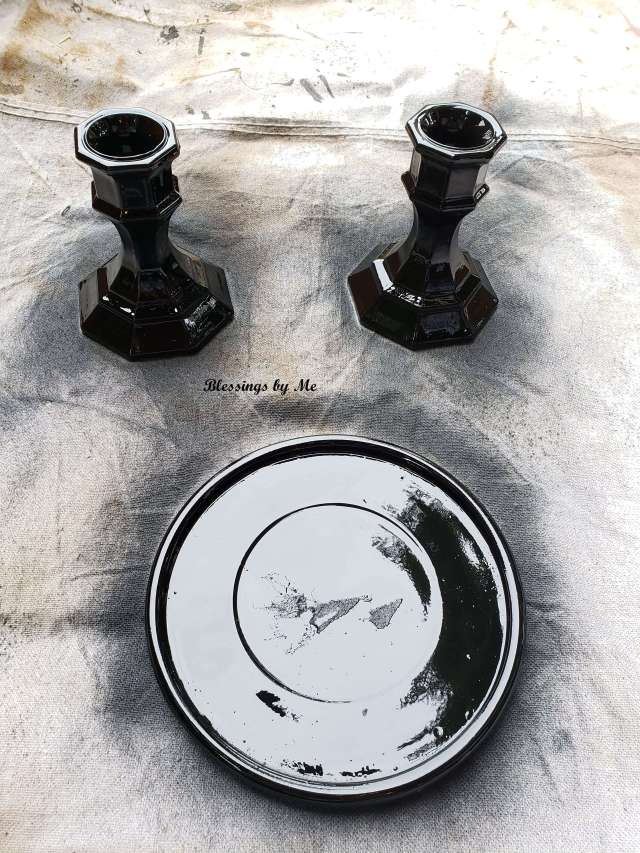
Step 1 – Paint the glass pieces
The first thing you need to do to make the spooky crystal ball is to paint the glass pieces with black spray paint. It takes a little while for this to dry so while they are drying you can work on the other part.
After the glass pieces have dried you’re going to glue them all together. The base is the two glass taper candle holders. Turn one upside down on top of the other and glue the tops together with E6000.
Using the E6000 adhesive, glue the glass dish on the top of the 2 candle holders. Set aside and let dry completely.

Step 2: Smoke the globe
Yes, that sounded a little weird, but I couldn’t really think of what else to call it.
To give the glass globe that spooky smoky look, carefully run the flame of a lit candle or lighter around the globe. It gets really hot so be very careful with this part!
Also, I had wax drip into the globe and on the sides, so if you have a lighter that may work better. Mine was almost out of fluid so I had to use the candle for this.


See how spooky it looks?

Step 3: Add embellishments
For the creepy effect of this spooky crystal ball, I hot glued a piece of the creepy cloth to the top of the globe and added a creepy-crawly creature. On the other side, I glued a plastic spider.
To get the skull inside, I tied a small piece of fishing line to the top and hot glued it to the inside of the globe. This way it looks like the skull is just floating around in there.
Put the glass globe on the top of your base part and add a little bit of the cloth to around the globe. On the side of this, I glued a plastic spider for more creepiness.

Decorate the base part of the spooky crystal ball, too by gluing another creepy creature to it.

These creepy creatures glow in the dark, so your spooky crystal ball will look great at night, too!
What do you think? Will you be making your own spooky crystal ball for Halloween this year?


Wow! Good job. Love it
Thank you so much!! 🙂
I’m not a fan of Halloween but this is cute ?
Thank you so much! 😀
I love this Michelle! How creative 🙂 and who doesn’t love a Dollar Tree project!
Thank you so much! I just can’t seem to stay away from Dollar Tree these days. 😀
Michelle I never would of thought to use flame to tarnish the glass. You are so clever. This decor piece will look so cool with your mirror. Love it!
Thank you so much! It was a lot of fun to make, too, although spilling the wax on the glass was a little hard to get off. 🙂
Such a clever and ‘spooky’ idea! So neat that it glows in the dark too!
Thank you!! I didn’t even realize the plastic pieces were glow in the dark until I started putting it together. 😀
What a cool idea!!
Thank you so much!! 🙂
This idea is so amazing. Thank you for inspiration. You are so creative.
New Post – http://www.exclusivebeautydiary.com/2019/10/dr-brandt-do-not-age-transforming-pearl_14.html
Thank you so much! 😀
Michelle this is so clever, and I never would have thought of using a flame to tarnish the glass, that’s a great idea. As always very clever and really looks eeerrrriiiieeeeeee. 🙂
Thank you so much! I wish I would have had a lighter so that the wax would not have dripped onto the glass because it was really hard to get that off. Lesson learned. 😀
I’ve definitely never heard of smoking a globe before it sure looks creepy!
I saw the idea of doing that a while back on Pinterest I think and thought, “Well I can do that!” 😀
Pinterest is so good for tips!
Pretty cool idea for a Halloween ? decoration!
Thank you so much!! 😀
You’re welcome ?
So spooky, and I love the glow in the dark creepy crawlies. Those will look great at night for the kids trick or treating.
Thank you! I thought about getting some black clothes and gluing the creepy crawlies all over them. 🙂
So awesome!
Thank you so much!! 🙂
This is so much fun Michelle. How in the world did you learn to do all of this? 🙂 If you do have trick or treaters come to your home, they are going to adore all your spooky decorations! Your kids must be thrilled!
I feel your pain about Virginia weather. It has been much the same here. Yesterday we had a coastal storm and it got pretty nasty – lots of severe, damaging winds and loads of rain (which we did need). The temperatures, like you said, have been nuts. Some days have felt more like winter already than Fall with the dampness. Oh well, I’ll still take it over the sweltering heat of summer! What about you? 😀
I hope you are well and that today is bringing better weather! ❤
Aww, thank you, Holly! I love creating new things! 🙂
Oh no! I hope everything is ok. We had some strong winds and rain yesterday, but nothing too damaging, thank goodness. I’m definitely not sad the heat is gone!! 😀 We’re getting sunny and chilly weather today, but still a little breezy. Which is perfect since we’re leveling gravel. 🙂
Ooooh. How’s that coming along? 🙂 I hope it’s going even better than anticipated. You must be excited to see things coming together a bit more…. It’s a feeling of relief isn’t it? A light at the end of the home renovation tunnel, lol. 😀
It’s finally all coming together! We got the gravel in and now we have to wait for our other guy to bring his machine to help put the dirt back. Now it’s basically down to waiting on everyone else. Then we can move to the inside work. 😀
Aww! I am so happy for you and your family Michelle. Seeing that progress makes all the difference!! Congratulations my friend 🙂 You’ve made it to the other side!
You are so creative Michelle! I bet this looks really spooky in the dark – great job! <3 xx
Bexa | http://www.hellobexa.com
Thank you so much! It does look spooky in the dark. I forget about it until I turn the lights off. 😀
Good job Michelle! ??
Thank you so much! 🙂
Such a cool and creative idea!
Thank you so much!!
Very creative! ??
Thank you! 😀
I love this! What a fun idea! 😀
What a great (creative) idea! ???
How creepy cool! So so clever!!
Jenna
Thank you so much, Jenna!
Wow Michelle, this is amazing! I really want to try this for myself! xxx
Thank you so much! It was a lot of fun to make, too! 🙂
I just this Spooky Crystal Ball DIY. I love that the skull glows in the dark. This is going to look so cool at a Halloween party.
Thank you! It does look spooky in the dark. 😀
I like it!
Thank you!
You’re welcome.