
Home Renovation Update #10 – The Bathroom Part 2
Come along with us as we renovate our 1946 home. This week’s home renovation update is the bathroom.

Here is a list of posts on our home renovation in case you’ve missed any:
Update #1 – The Bathroom
Update #2 – The Roof
Update #3 – Foundation Part 1
Update #4 – DIY Rustic Wood Shutters
Update #5 – Foundation
Update #6 – Foundation Part 2
Update #7 – Foundation Part 3
Update #8 – Dining Room Windows
Update #9 – Living Room Picture Window
It has been quite a while since my last home renovation post, but that doesn’t mean we haven’t been working on it. A lot has been going on since the last post. Our main focus right now is the bathroom.
This room has given us a lot of trouble and I really hope the rest of the house goes smoother than this. Nothing in the bathroom was level or straight.
The floor in the bathroom was sagging in one spot so we had to add sister joists under the floor to level it. That was quite hard since the joists are heavy and we had to stand on ladders holding the joists up while my husband clamped them down. Then he had to screw them in to get them to stay. It fixed the problem, at least.
All of the plumbing and electrical also had to be replaced. When I moved into this house there was no electrical outlet in the bathroom. How in the world did the Mrs. dry her hair? The more we tear apart in this house the more I wonder what they were thinking when it was built.
Here’s the first part of the photos in the bathroom renovation. I’ll share more next week because I don’t want to overwhelm you with a really long post.
Our Home Renovation – The Bathroom Part 2
Here is a photo of adding the sister joists as I mentioned before. These joists are pretty long, so my husband and I were on ladders on each end to put it up. Then he would clamp one end, then the other to get them to go together. Most of the time he had to hammer them really hard to get the board to move at all. This was a pretty tough process.

Luckily we had enough room to work since we have a basement and it wasn’t directly under the house.
Smaller boards were added going across for extra protection.

As I mentioned all the electrical had to be replaced in the bathroom. New wires had to be run for a new outlet, plus new wires going to the heat and the light switch. (We have ceiling heat, which I actually love.)

Next, we removed the old bathtub.
I have to admit, I was a little worried about this part. I was terrified of what was behind the wall and under the tub. Luckily it wasn’t as bad as I thought. It was gross, but I was expecting way worse.


After the tub was removed we had easier access to the wall, which also came down.

The linen closet doors were removed, shelves taken out, and boards torn out.


We also tore up and removed the entire floor. There were layers and layers of flooring!

The last layer was this red vinyl floor which was pretty retro.

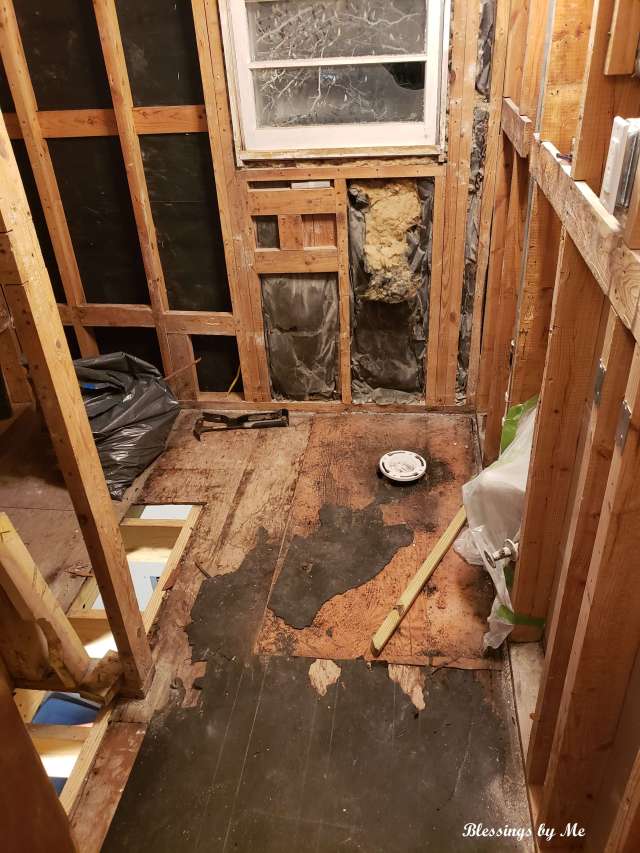

We had to be extra careful walking around in there or we’d end up in the basement!
New boards were laid for the floor.

Of course, all the plumbing in the bathroom had to be replaced, too. That took quite a while to do, but luckily my husband has Sketchup so he was able to plan everything out in detail before starting. This was a huge help so no mistakes were made costing us more money and time.
New pipes were put up for the sink, toilet, and bathtub/shower.

That’s all for this week! I still have more to share and it’s coming along rather quickly now.
I hope you’ll join me next week for more home renovation updates!
This is fascinating !
Our home has also been renovated. It was built in 1915, and it still has tree branches in the attic, helping to hold up the roof.?
I am not a renovator but I do watch a lot of renovation programs. I like what you are doing, it’s wonderful
I love to watch those programs, too. I would love to be able to do some of the things they do! Thank you so much!!
Oh wow!! I can only imagine how beautiful that is! 🙂
I admire what you are doing with this renovation. It takes a temperament of patience and perseverance to work on renovations.
We still have the original 1915 staircase in our home.
Your blog posts are fascinating to me. Thanks ?
Thank you! I’m glad you enjoy them. That’s amazing that you still have the original staircase! ?
Thats a lot of work
Yes, it is! And it’s still not finished, although we’re a whole lot closer, thank goodness. 🙂
Coming along really well, looking beautiful. You have put in a lot of admirable work. congratulations.
Thank you so much! 🙂
The finished rooms make these bare-bones photos all the more special when the job is complete! I’ll have to check out “Sketchup”!
So true. It’s been a long and tough road, but I know it will all be worth it soon. Sketchup is really neat for doing all sorts of things, especially in 3D. It has really helped us a lot when planning for all this stuff. I hope you get to play around with it!
What an amazing project to focus on, especially now! I’m sure this provides all the distraction you need ?.
Yes! It has definitely kept us busy. Otherwise, I’d go crazy! 😀
Maybe I should tear down a wall for the hell of it!! ??
?? Go for it! It’s a great stress reliever.
Serious work going on. Can’t wait to see the finish product.
Thank you! I’m looking forward to getting done. 🙂
WOW! what a job you’re doing, I can just imagine how gorgeous your house will be when you’re done. I give you and your husband a lot of credit for doing this, amazing how handy you guys are. xoxo
Thank you so much! I can’t wait to finish with everything, but I know it will take some time. Hopefully not as long as this bathroom, though! lol! 😀
This reminds me of gutting the bathroom in the house we used to live. Layers and layers of flooring, and even ancient newspapers under the flooring! It was quite fascinating!
Oh wow! I bet the newspapers were really interesting to see. It’s fun to peel back the layers sometimes. You never know what’s waiting there for you. 🙂
That’s for sure! I couldn’t believe the crazy patterns of flooring!
Wow, Michelle, that looks like lots and lots of work! Blessings!!
Oh my goodness, yes! It has been a pain in the behind. Hopefully, there are no more problems and we can finish up soon. 🙂
Slowly but surely you are getting there. Lots of work.
It seems like it has taken forever! 🙂 And yes, it is so much work. Hopefully we’ll be done soon!
Crazy amount of work, but it looks great. Can’t wait to see the “after” pictures.
Thank you! It has been a ton of work. I’m ready to be done! 🙂
Bathroom renos are the worst, but it looks like you’ve got it under control.
Yes, they are! Especially when nothing is level. Thank you!
WOW – that is a lot of work!
It has definitely been a ton of work! Especially since nothing is level or straight in our bathroom. lol!
I have lived in older houses – that sounds very familiar!
Wow, I don’t know how you guys do it all! ?
It has been so much work! But I’m glad we’re doing it ourselves. 🙂
Wow! Looks great, Michelle! My ex husband & I retiled our kitchen years ago. It was strenuous but the end result was a great feeling. ???
I didn’t realize how much went into tiling a floor until we decided to do our bathroom. I’m looking forward to finishing. 🙂
Amazing project waiting to see the finished work Michelle !! ???
Thank you! I’m so ready to be done. 😀
Hope you finish it soon !! ?
You’ve definitely been busy, Michelle! Goodness that’s a lot of work. I know because we renovated our half bath last year. Your space is WAY bigger. Kudos for taking it on, though. I can’t wait to see how it all turns out!
It has really been a lot of work. Even more so since nothing is level or straight. We had to fix all the walls, too just to put up the drywall. Ugh! I’m so ready to have it finished. Hopefully not much longer. 🙂
What an amazing project to be working on!!
It has definitely been a lot of work. I can’t wait to be done! 🙂
It’s fabulous to peel back the layers of history isn’t it? So excited for the next episode 🙂
It is! You just never know what’s under there. 🙂 Thank you!
I’m so glad to you are back at it. Wow what a job. Maybe a new show called “Property Spouses” is in the works here. ?
Haha! I like that idea! 😀
It looks like really hard work! We are making some renovations in my house too, today we are working on my bedroom and I’m sure you guys deserve a massage! Thanks for sharing!
Lindifique
Good luck with your renovations and the bedroom. 🙂 Yes! I could definitely use a massage and a vacation! 😀
I love your renovation posts! You guys sure are hard workers and it shows in all the progress you’re making. We’re slowly having some remodeling done. Our master bath might be a bear so I was especially enjoying this post today. Take care and don’t work TOO hard!
I’m glad you’re enjoying following along. It’s been quite a process! We finally got the tile laid so we’re even closer. 😀 I’m ready for a vacation!
I’m sure you are!! ?
Wow, Michelle! We had a 1960 home, and found much the same situation with the layers of flooring, which had to be abated before the new flooring could be installed… You guys are doing such a great job! ♥
It’s amazing what you’ll find in an old home! Thank you so much! 🙂
Wow you guys are working hard. It’s going to look nice when you’re done!
Thank you! It’s been a really tough job so far. 🙂
Wow. And wow again. That’s quite a whole lot of work. But glad you are taking one step after another and making progress.
Are you both engineers by the way?.
You both are doing great work. ?
Thank you so much! No, we’re no engineers. We’re actually learning as we go! 😀
You are welcome. ?
Smiles. Okay!.
That’s cool. You both seem more like engineers to me already. ?
Wow, this sounds like a huge job but it looks like you’re making great progress! x
Sophie
It’s a lot of work and taking forever, so I’ll be glad when it’s over. Thank you!
I am always amazed what ou two are doing. Hard work and lots of knowledge required.
Thank you! We do so much research before starting and sometimes as we’re going along. We’ve definitely learned a lot! 🙂
Oh my goodness! Michelle, you all are doing a ton of work on your house! I totally need to catch up. The bathroom is starting to look fresher after you have put in the new subfloors. Our house is older and the bathroom floors don’t feel as “solid” as they ought to. When we eventually change the toilets out, I fear we will be in for a “surprise” and will end up needing to tear things out to redo flooring as well. BTW, I love your shutters you all DIYd.
When we tore up the vinyl floor in the bathroom we noticed that the wood surrounding the toilet and near the sink had been replaced at some point. I’m guessing there was a leak and maybe rotted the floors? I’m glad they fixed it because falling through the floor to the basement while sitting on the toilet is not on my to-do list! I hope you all don’t have too many surprises and things go smoothly. Thank you!!
I think those wet areas really take a beating over the years. I wouldn’t want to fall through to the basement either 🙂 I guess someone would end up in my kitchen or dining room, lol!
Looking good Michelle ? Renovations are no small undertaking. It must be so great to work with your partner on such a project.
Thank you so much! Working with him is fun, but can be challenging at times as well. 😀
?? My wife and I even get in each others way in the kitchen, Haha so I definitely I get where you coming from
??
Quite a daunting task! Good luck!
Thank you!! We definitely need it! 🙂
Michelle, It’s absolutely amazing, how you two are tackling these big projects in a very small budget. I am so impressed the way you and your husband are doing all this together without having any experience. I wish you would have been living closer to us.
Thank you! We have really learned so much doing all of this. I just hope the next house doesn’t have as many big problems to deal with! 😀