
Upcycled Thrift Store Art DIY
See how I turned thrift store art into something cute and fun for under $5!

My mom and I love going to thrift stores and sales. Every year (with the exception of last year’s pandemic) we go to 2 or 3 big thrift sales put on by 2 churches. No matter what, I always end coming home with some really nice stuff for cheap.
One year, I found this really neat art piece that someone had made by punching holes into a piece of metal.


When I was younger, my mom used to save tin cans and punch holes in the sides using a nail and hammer. Then she’d add a candle and have the prettiest tin can luminaries!
I’m assuming that’s how this piece of art was made. And if so, it must have taken some time and patience to create a horse out of tiny holes!
Of course, I just wanted this piece of thrift store art for the frame. I love the old wood and how you can tell it was handmade. It looks so rustic!
Keep reading to see how I turned thrift store art into something fun and pretty for my bathroom!
Upcycled Thrift Store Art DIY
*Post contains affiliate links. They are free for you to click on, however, I will be compensated if you make a purchase. This supports my family and I thank you for your support! To learn more, click here.
What you need:
- Framed thrift store art
- Wall stickers from Dollar Tree
- Foam board (I already had this on hand, but you can get this from Dollar Tree, too)
- Contact paper (I used this one)
- Optional: Jute twine or ribbon for hanging
What you do:
Step 1
Since I just wanted the frame, I removed the metal piece that was inside. Then I laid the metal piece on top of the foam board, traced around it, and cut it out.
(For some reason I forgot to take pictures of this step, but hopefully you get the idea.)
Step 2
Next, I laid the piece of foam board on top of the contact paper and traced around the outside of it. Then I cut it out and placed the contact paper onto the foam board.
My edges weren’t perfect, but it didn’t really matter since they were going to be covered up by the frame anyway.


Step 3
After cutting the foam board and covering it with the contact paper, I placed it back into the wood frame. The only thing holding the piece of metal in was a few nails. Luckily the foam board fit nice and snug inside the wood frame.
However, if this doesn’t work for you, you can always add a piece of tape to hold it in place.

Step 4
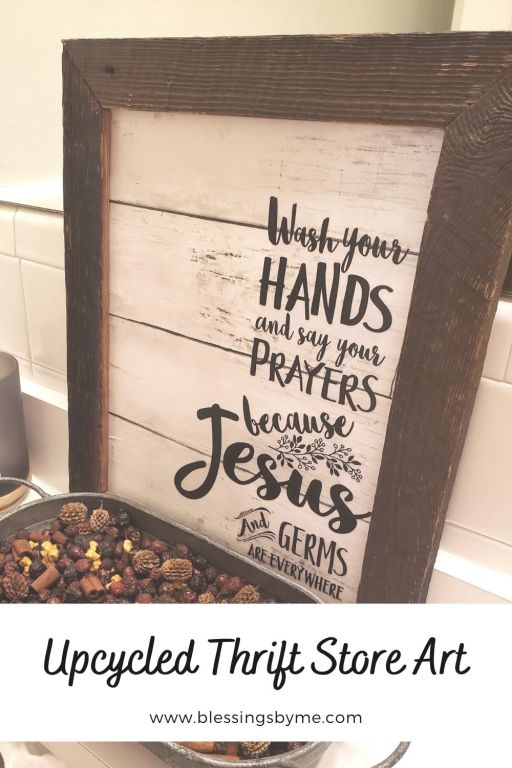
I used these wall stickers from Dollar Tree. I loved the quote and thought it would be cute in my bathroom!


The stickers are in 3 different parts so you can take them off and place them however you want. They remove easily, too.
I decided to place the wall stickers down the right side instead of in the center.

Step 5
Decorate!
Now that the thrift store art has been upcycled into a fun rustic frame for my bathroom, all I had left to do was decorate with it. I sat it on the shelf in the downstairs bathroom because I already had my DIY bathroom signs hanging on the wall.


I love how this DIY rustic bathroom décor turned out. And it cost me less than $5 to make!
Have you ever made over a piece of art from the thrift store before?
Looking for more upcycled DIYs? I recommend these:
DIY Growth Chart Ruler
Upcycled Mailbox Planter
Repurposed Flower Pot Using Napkins
Farmhouse Style Footstool Makeover

Very nice DIY ❤
Thank you so much!
Holy moly!! I love this…simple to make and inexpensive! It looks great!
Thank you so much!
Such a clever idea. Love it Michelle.
Thank you!!
That is really neat. Love it!
Thank you!!
This is a great idea. I loved how it looked when finished. I also did the tin can and nail thing years ago. They did make good candle holders.
Thank you! They are really pretty. I’ve thought about saving some cans and making some for Halloween to sit on my porch. 🙂
I love that sign about Jesus and germs . . . so true. 🙂
Haha! Yes it is! 🙂
such a cute sign. Love the saying!
Thank you so much! I was so glad to find the stickers at Dollar Tree. Usually they’re sold out.
Oh, my goodness I love that message. Such a brilliant idea.
Thank you!! I was so glad the dollar store had these stickers. They’re usually sold out. 😀
So simple yet looks expensive! Love it!
Thank you so much!
This is too cute! I love it! And You are so creative. Thank you for sharing this! ❤️
Thank you so much!! I couldn’t pass up that frame. 😀
Cute sign! I enjoy the saying!
Thank you so much!
Ha, that’s funny!
😀
Really nice. Love the message ?
Thank you so much!
I love that message! ??
Haha!! Me, too!
Michelle, I absolutely LOVE this DIY. So cute!! The quote made me smile…and it’s true! You always make the most incredible designs look effortless. I wonder what you’ll find at those great thrift sales this year? ? I bet you and your mom are anxious to find out!
If I were visiting your home and using this bathroom — I would be impressed by your creativity. And you’ve made it so simple to recreate. As always, you knocked it out of the park. I’ve pinned & shared so others can come enjoy too! ♥
Thank you so much! I hope we’re able to go to thrift sales this year. Who knows what will happen any more. One minute everything is open and fine and the next minute things are closed down.
Aww..thank you! I love sharing DIYs that others can make, too, especially when they’re on a budget. Thank you for pinning and sharing! Hugs!