
Paper Bag Carrots DIY
Turn paper lunch bags into cute paper bag carrots with this easy-to-follow step-by-step tutorial!

I’m so excited that Spring is just right around the corner!
I don’t know about you, but those long dreary winter months can make it hard to get motivated.
I’m looking forward to more colorful, warmer, and longer days.

This month I’m excited to join some great DIY bloggers for a fun seasonal inspirational blog hop. It’s my first time joining in with this challenge, so I’m looking forward to seeing all the amazing Spring inspirational ideas!
This fun seasonal challenge is hosted by Cindy who blogs over at Cloches & Lavender and Terrie, who blogs over at Decorate & More With Tip. Both of them do some really amazing DIYs so I hope you’ll go check them out!
For the challenge, I decided to make some easy and adorable paper bag carrots. Only a few items are needed to make these paper bag carrots. And they look so cute when they’re finished!
They would be so cute decorated with the rustic bunny I made last year.
If you’re joining me from Liberty’s blog at B4 and Afters, then welcome! I’m so glad you’re here today!
Paper Bag Carrots
*Post contains affiliate links. They are free for you to click on, however, I will be compensated if you make a purchase. This supports my family and I thank you for your support! To learn more, click here.
What you need:
- Brown paper lunch bags
- Jute twine or yarn
- Paint
- Glue
- Scissors
- Cinnamon (optional)
What you do:
Step 1
First, cut the bottom off of the brown paper bag. Hold the bag up and unfold the bottom part. Then cut along the crease where it was folded. Save the bottom piece because you’ll use it later.
Next, find the line on the back of the bag where it was sealed together. Use scissors to cut along the line. Lay the bag out flat.
Fold the paper bag in half.


Step 2
Start rolling up the bag from the bottom into a cone-shape. Keep the bottom part somewhat tight and allow the top to remain a little more open.
After you get a cone shape, add a little dab of glue to hold the paper bag together.

Step 3
While the glue is drying, mix up the paint.
I used Apple Barrel paint in the color Harvest Orange.
Pour the paint into a cup, add a little bit of water, and mix well.
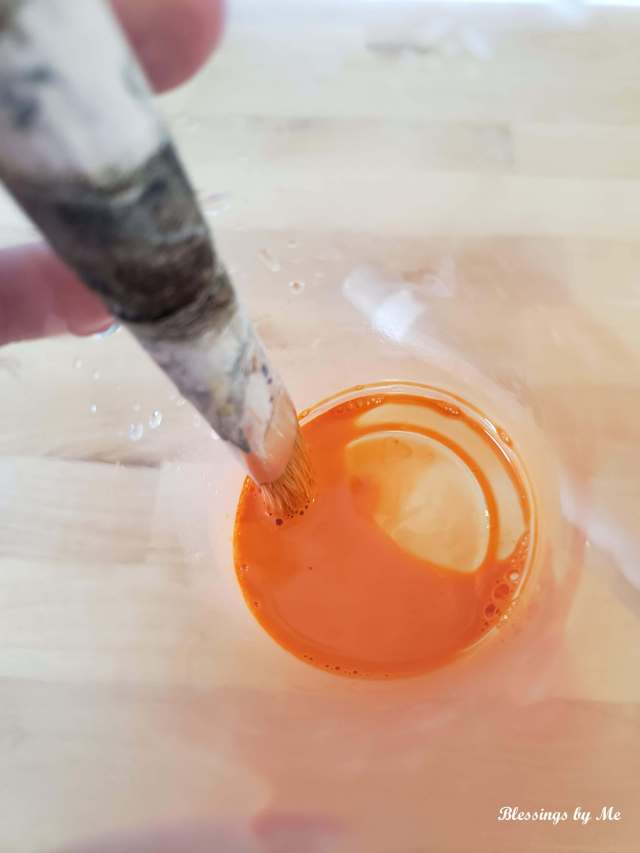
Step 4
Use the paint mixture to paint the paper bag carrots. Lay them aside and let them dry.

For my second carrot, I mixed a little bit of cinnamon into the paint. I’m not sure exactly how much I used, but it was enough to make the paint thick.

Then, I used the paintbrush to dab the paint onto the bag instead of brushing it on. It made it look somewhat “chunky” and gave it that primitive look. Plus it smelled really good!

Step 5
While the paper bag carrots are drying, it’s time to make the “stems”.
Cut about 6 – 8 pieces of jute twine into 14-inch long strips. Holding all the strips together, fold them in half.
Use a smaller piece of jute to tie the strips together at the bottom.

Step 6
After the paper bag carrots are completely dry, fold the top edges of the bag down inside the cone.

Put a good amount of glue around the bottom part of the twine that is tied. Then stuff it down into the top of the cone.
Squeeze the top of the cone onto the twine to make sure the glue gets on the insides of the bag.

Step 7
Now lay the paper bag carrots side by side and cut a piece of jute twine long enough to tie around them and make a bow.
Remember the bottom part of the paper bag you cut off in step one? Grab that, and cut out a small square. Use a marker to make a “price tag” for your carrots.
Glue the “price tag” to the bow tied around the carrots.

That’s it!
Now you can decorate for Spring with your DIY paper bag carrots!
They look cute in the back of my old red truck.

Or resting inside a tobacco basket!

Now let’s see go see what Tammy’s Spring inspiration is over at Patina and Paint.
Then come back here to see some more great spring inspiration!

CLOCHESANDLAVENDER | DECORATEANDMOREWITHTIP | DIYBEAUTIFY

THECROWNEDGOAT | THEHOUSEONSILVERADO | B4ANDAFTERS

BLESSINGSBYME | PATINAANDPAINT | JUNKTOGEMS

FRENCHETHERAL
And don’t forget to pin my paper bag carrots for later!


OMG how adorable 🙂 and I love the little sign carrots 5 cents, just perfect. Thanks xo
Thank you so much!! They’re so fun to make I’m thinking about making a bunch more! 😀
What a simple, easy DIY! I bet you could sell those on Etsy….
Thank you so much! That’s a really good idea. Now you’ve got me thinking… 😀
These carrots are really cute Michelle! ?
Thank you so much!!
Oh my goodness! They are so cute! I love this idea, especially with the red truck!! 🙂
Thank you so much! The red truck was mine from when I was little. My grandparents saved it and gave it to my mom, then she recently gave it to me. I’m so glad they saved it!
I love that! A precious keepsake with family history ❤️
Michelle,
how cute are these carrots? Great idea. I have some green jute – no idea where I got it – and some paper bags from making Christmas stars that I am definitely going to be making carrots with. Such a great idea!!!
Thank you so much! The green jute would be so cute. I know I got some from Dollar Tree one year but I couldn’t find it anywhere. I’m so glad you’ll be making some carrots! 🙂
These are fantastic Michelle. I love the texture the cinnamon added and they look adorable in your red truck.
Thank you so much! Adding cinnamon to the paint turned out better than I thought it was going to. 🙂
Hi Michelle, these are so cute. You blow me away with your creativity. I pinned them and am going to try them and I will tag you when I do. Thanks for the inspiration.
Thank you so much! I’m so glad you’ll be making some. They’re so fun and easy! 🙂 Thank you for pinning!
Dying over these super cute paper bag carrots, Michelle! They’re so awesome. Love the way you added the cinnamon to give them a big of texture too. That is really creative. Can’t wait to try this! Hugs, CoCo
Thank you so much! Adding the cinnamon was a last minute decision, but I’m so glad I did! I love how it turned out. 🙂
So cute and thrifty! The cinnamon was a great addition!
Thank you so much!!
These are so cute!
Thank you!!
It’s super cute carrots! And easy to make. Well done!
Thank you so much!!
Oh, those are so cute, what a great idea!
Thank you so much!!
Oh my gosh Michelle these carrots look so real. Great idea to add the cinnamon to the paint that topped the whole look of the carrot. Love your little truck as well. Happy Spring Michelle.
Thank you! Adding the cinnamon was a last-minute decision, but I’m glad I did. I love how it turned out! Happy Spring!
Oh my goodness, Michelle! Your carrots are absolutely ADORABLE! Such a creative idea! Pinned!
Thank you so much! I had a lot of fun making them, too! 🙂
What a great idea! I never would have thought of putting CINNAMON in the paint, but I love the effect!
Pinned.
Niky @ The House on Silverado
PS. I’d love it if you’d share this at my link party, Sundays on Silverado, which is open now. ?
Thank you! The cinnamon was a last-minute decision, but I love how it turned out!
Thank you for pinning and for inviting me to share on your link party! 🙂
This is a great idea and the cutest ever! Thank you for sharing Michelle.
Thank you so much! They’re so much fun to make, too!
Very cute and smart!
Thank you so much!
Totally fun idea and this would be a great project to make with kids! Thanks for the easy tutorial, Michelle!!!
Spring hugs to you,
Barb 🙂
Thank you! I agree! It’s easy enough that kids could have fun making some, too. 🙂
Very cute!
Thank you!
So adorable ?
Thank you so much!!
These are a really cute idea! I need to try them with my daughter!
Thank you! She’ll have fun making them, too. 🙂
An adorable and rustic craft! I agree with you about looking forward to warmer spring weather.
Thank you so much! Yes, I’m ready for the spring temps and no more ice storms. 🙂
These are too cute and I bet they smell great too!
Thank you! They do! My living room smells like cinnamon now. 🙂
Great idea and these carrot looks cute Michelle !! ?
*carrots
Thank you so much!! 🙂
Nice!! Those are super cute! And I never thought about using my little “Christmas” fire truck decoration year round..I usually tuck a tiny artificial evergreen tree in the back of it at Christmas time but why not carrots in the Spring?! Love it!! Cute idea!
Thank you!! I leave my truck out all year and just move it around the house. I just can’t seem to put it away! haha
Hahahaha I love that!! It’s cute!!
Mixing cinnamon into paint, who would have thought it?! It looks like they were just pulled from the ground!
Right? And it smells, good, too. 🙂 Thank you!
Those look incredible; I would never have guess the origin! Pinned 🙂
Thank you so much! 😀
Your carrots are cute, and I bet you find a use for that truck in all the seasons!
Thank you so much! I do! I keep moving it around the house to decorate different rooms. 😀
I love the truck with the giant “carrots” on the back. 🙂
Thank you! I use that truck for everything. lol! 😀
This is such a cute idea ??♀️?
Thank you so much! 🙂
I like the cinnamon,
detail – nice little touch.
Thank you! I love how it turned out. 🙂
Your carrots look awesome ! I love how you gave them a rustic effect with the dabbing details.
Thank you for sharing with us at Meraki Link Party. We’re delighted that you joined the party.
Much love
Naush
Thank you so much!!