
Rustic Bunny – Dollar Tree DIY
Creating a rustic bunny has never been easier! All you need is a few supplies from Dollar Tree and scrap fabric. Read on to see how to make this cute rustic bunny for Easter!

*Post contains affiliate links. It’s free for you to click the links, however, if you choose to make a purchase I will get compensated. To learn more click here. Thank you for supporting my blog!
I hope you are all doing well! Last week was very hard for me with all the unknown and places closing down suddenly. The most anxiety-producing part for me was the empty grocery store shelves.
Because of last week’s high anxiety levels, this week I’ve felt more down and depressed than I have in years. I almost didn’t post today because I just couldn’t find it in me to create anything.
However, I pulled myself together to create a rustic bunny from items I had purchased from Dollar Tree a few weeks ago. Of course, this was before “you know what” and I felt safe stalking the shelves of local stores.
Actually, this little bunny only needs 1 thing from For more Dollar Tree DIY’s, click here!

Rustic Bunny
What you need:

- Bunny decor from Dollar Tree
- Fabric
- Jute twine
- Hot glue gun and glue
- Bow or ribbon to make a bow
- Scissors
What you do:
Step 1
Since I only needed one bunny I cut them apart. There’s a tough plastic ring holding them together, but I was able to cut it with scissors.

I also cut off the little plastic piece that was holding the ring on.

Step 2
After separating the bunnies I removed the white tinsel that was wrapped around the plastic bunny form.
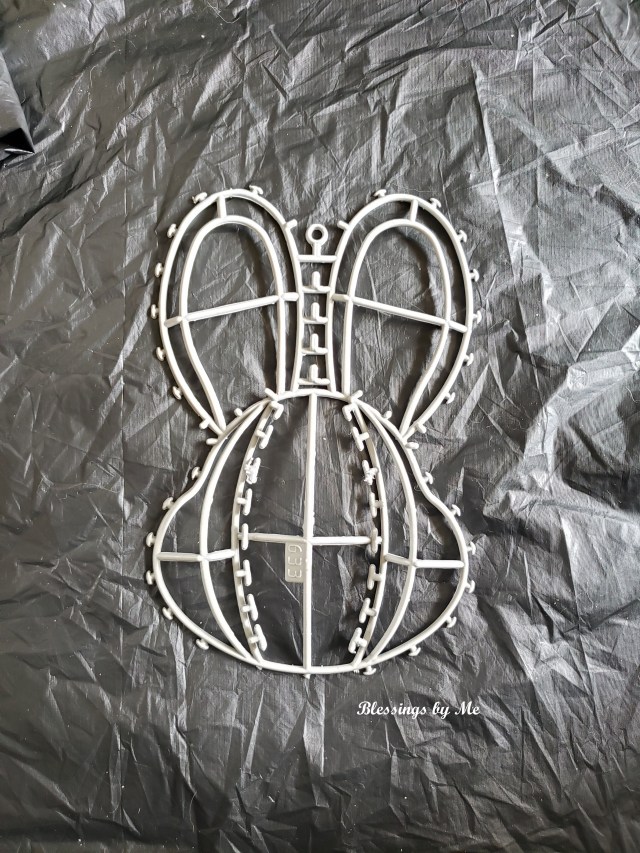
Step 3
I removed all the outer pegs that were sticking out along the sides of the bunny form, including the ones between the ears.
The pegs between the ears are a lot stronger and thicker, but most of them popped right off easily.

Step 4
Next, I laid my bunny form onto a piece of fabric that I already had on hand. Then I traced around it with a pencil.

Step 5
After tracing around the bunny, I cut it out, but not right on the line. I wanted a little extra fabric so I could glue it to the plastic form.
Apparently I need new scissors because they could barely cut through this fabric! Either that or I need to relearn how to cut.

Step 6
I wish I would have left a little more fabric on the sides when cutting. It would have worked better to pull the fabric around and hot glue it to the back.
However, I didn’t do that, so I glued the fabric to the front, pulling some around to the side and hot glued it all down.

Step 7
Next, I outlined the rustic bunny with jute twine. I just hot glued the jute around the outside edges all the way around.

Step 8
The last step is to add a cute little bow to the rustic bunny’s ear. I made a simple bow from ribbon that I had on hand.

That’s all there is to it!
This rustic bunny is a simple Dollar Tree DIY that only cost me $1 to make! And I love how cute it is with my Easter decor.
I also have 2 other bunnies left over so I can come up with other cute ways to use them. So I guess in a way it really only cost me about 33 cents to make this project.


Most of the pieces on my shelf are DIY’s from past projects. I share the full instructions in my posts, which you can find here:
Farmhouse Milk Bottles
Fabric Covered Easter Eggs
Painted Wood Blocks with Words
For more Easter DIY’s, click here!
Love this Dollar Tree DIY rustic bunny project? Pin it for later!


So cute
Thank you so much!
Your welcome.
Aw this is very cute. Thanks for sharing the process 🙂
Thank you so much!!
So cute! Spring decorations are my favorite ?
Thank you so much!! Mine, too. And fall! 😀
That’s cute Michelle. I like how you had to improvise with so little at hand. Glad this project kept your mind off the current quarantine situation…keeping busy and being creative are always a winner 🙂 I’m finding consuming content you find beautiful online also helps keep the anxiety down (things that inspire you, things you dream of doing, things that just plain relax you, etc). Stay safe and well!
Thank you so much! Thank you for sharing that with me. I’m trying to stay away from all the negativity and focus on more entertaining and positive content. 🙂 I hope you’re doing well!
Very sweet.
Thank you so much!
??????⚘
Aww, I’m glad you took the time to be creative and that it helped. I’m sorry you’re feeling so anxious. I’m just enjoying the extra rest at home, and the extra time to be creative.
Liberty
Thank you so much! I’m glad you’re resting at home and enjoying being creative. It really helps during this time that we’re all going through.
Super cute and simple, love it!
Thank you so much!!
I’m glad you’ve pulled yourself up as this bunny is so so cute ?
Stay positive Michelle and stay safe!
Thank you so much! I’m hoping this week will get better and things settle down. I hope you’re doing well!
Just love all your projects, Michelle. I hope you are feeling better. I will keep you in my prayers. God bless and stay safe.❤❤❤
Thank you so much! And thank you for the much needed prayers as well. That means a lot to me!
So cute! God bless!
Thank you so much! I hope you’re doing well!
Love the bunnies! I get you on the depression. The food worries are really stressing me out – on top of the move – and not being able to be at my parents who are a huge help in stuff like this. It took a whole lot of scrolling through ads to get to this comment box! I wonder if my phone was acting up. Lol!
Thank you! It’s overwhelming when you are going through so much and then something like this happens. It’s scary that the grocery stores are empty and can’t keep up! I can only imagine how you must be feeling having to go through all of this plus moving in the middle of it. My prayers are with you! (I have Google ads and they keep doing “experiments”, which seems to just be worse! I’ll check into that. Thank you for letting me know!)
Sometimes my phone duplicates things so it may just be me! And yes, not being able to get groceries we need plus trying to pack and now we just found out the buyer’s lender didn’t even put their paperwork through so this whole thing could fall apart because closing is supposed to be next week! ?
Oh no!! Fingers crossed and prayers sent up that everything works out!
So far this morning it is looking good! Here is hoping!
I’m glad to see that you decided to pour yourself into your creativity and get out of that anxiety. Yeah seeing the empty shelves can get us anxious, but remember this is not forever and you are very inventive and I know you can improvise and create a meal out of what you can get. And this is another clever DIY project. Thank you Michelle and if you need any support I can give, get in touch with me. xoxo
Thank you so much for your support! That means so much! You’re right. I do need to remember that this will not be forever and things will hopefully be more normal soon. Thank you!!
Wow! This is amazing! I would never have thought of this! You are so talented! Love it!
Thank you so much!! I actually started this project differently and just kept taking it apart. 😀
Well I think the final result is perfect!
Thank you!
I could not help but smile when I saw your adorable bunny, Michelle. That is as sweet as sugar! I love how you’ve paired it with your other Spring creations. It’s perfect! Creativity can be incredibly healing during periods of high stress, can’t it? It’s just the medicine we need when everything else is entirely outside of our control. I’ve pinned and shared this, as always!
My heart breaks to hear that this past week has left you reeling in depression. I am sending you tons of huge hugs. My prayers are also with you & your family. Even when we aren’t actively listening or watching news – the spiritual atmosphere has been heavy and full of despair. I know how you feel.
In these times of craziness, I am grateful for friendships like yours, good, uplifting and funny posts or people who are out there spreading kindness and joy. When it’s dark, light shines that much brighter!
Sending you all my love sweet Michelle. This too shall pass. In the meantime, lets find things to celebrate and laugh about! We could use all the positivity humanly possible.
I’m still waiting on that DIY toilet paper recipe from you, though… No really! ???
Thank you so much! It took me a little while to figure out exactly what I wanted to do, but I finally got it! 🙂 Thank you for sharing!
Thank you for your prayers, as well. I’m praying for you, too! Thank you for the positive messages you always give! And those funny cats on Fridays always lighten my mood! Now I’ll get to work on that toilet paper post! ??
Oh it’s adorable! And I agree that it’s good to have things like crafting to take your mind off what’s happening in the world.
Thank you so much! Crafting really does help keep my mind occupied. 🙂
I don’t know why WP says I am not following you but it’s very frustrating. WP, why?! I think I need to check out your website to get updates rather than rely on the reader. Your crafts look very interesting and reminds me of the crafts my mom used to make. ?
I’m not sure, but it does the same to me on some blogs. I have to refresh the page and usually, it works then. Thank you so much!!!
I’ll keep checking your blog on a regular basis, even if WP decides to remove me as a follower. I see your name pop up often because we follow similar blogs! ??
Thank you!! 🙂
I am feeling just like you are my friend. I have been trying to snap out of it but it’s just not happening! Your bunny is so cute! What an easy project 🙂 Sending hugs your way!
It’s hard since it just keeps popping up everywhere you look. Thank you so much! And I’m sending hugs right back! From an acceptable social distance, of course! ?
Oh so cute!
And feel better… I was pretty bad a few days ago… and as long as I don’t watch the late news I’m better. I watch a little in the evening and I’m done!
Sending hugs!
Thank you so much!
Thank you! I’m glad you’re doing better and not watching the news has helped. Sending hugs back! Thank you!
Cute!
Thank you so much!
You are welcome Michelle!
Nice!
Thank you!!
I’m glad you still decided to post ?. Hang in there, it’s an extraordinary time for us all but it will get better one day. Stay as healthy and sane through this madness that you can. ❤️
Thank you!! That’s very encouraging! ❤️
Cute bunny. Hang in there. Things will improve.
Thank you so much!
Go Girl, love it.
Thank you so much!!
My pleasure.❤️
Looks nice, very creative! Thanks so much for linking up with me at my #UnlimitedMonthlyLinkParty 10, open March 1 to 26. All entries shared on social media if share buttons installed.
Thank you so much!!
I don’t know how you keep up the ideas! Great read!
Thank you so much!
Absolutely!
This is such a cute DIY, Michelle, and I am so glad you shared it. These are strange and uncertain times for us all, and you’re not alone in feeling that way. I hope that things get back to normal soon. Stay safe in the meantime.
Thank you so much! And thank you for understanding. It has been a crazy time. Hopefully, things will return to “normal” soon.
So so cute, you are so creative. Lovely.
I am happy you feel better, blessings to you. Your website is so well put together, its life visiting a well put together and clean home.
Aww, thank you so much for your kind words! You’ve made my day!! 😀
Michele, you’re amazing the way you take the bones of dollar store items and make something beautiful and unique. You inspire me.
Thank you so much! That means a lot to me!
I nominated you for the Liebster award! If you are free to do it then please do and if you can’t……. ITS OK!
Thank you so much!!! ?
No problem!!!
No problem Michelle!!!
Smiles. I love the idea and the simplicity it came with it. ?
Thank you so much!!
You are welcome. ?❤
Super adorable! I’m always amazed at how you transform tacky Dollar Tree stuff into classy decor. 🙂 Great job and hang in there!
Thank you so much!! 😀
Very cute and a great way to keep your mind occupied. Thank you for sharing at Party In Your PJ’s.
Thank you so much! 🙂
Michelle, thanks for sharing. You remind each of us that we need healthy diversions during these unsettling times.
Thank you for understanding! 🙂
quite creative!!
Thank you so much!
Cute, simple and craft! Just my style!!
Thank you! I love simple, too. 😀